MIDRANGE BEAST HUNTER DECK LIST GUIDE
- Last updated Apr 18, 2017 (Un'Goro Launch)
- Edit
- |
Wild
- 24 Minions
- 5 Spells
- 1 Weapon
- Deck Type: Ranked Deck
- Deck Archetype: Midrange Hunter
- Crafting Cost: 5340
- Dust Needed: Loading Collection
- Created: 4/9/2017 (Un'Goro Launch)

- Daolh2610
- Registered User
-
- 4
- 19
- 28
-
Battle Tag:
N/A
-
Region:
N/A
-
Total Deck Rating
130
Our Midrange Beast Hunter deck list guide will teach you how to pilot the new version of one of the classic Hearthstone decks!
Introduction
Midrange Hunter is one of the most popular archetypes in the history of Hearthstone. Rexxar was a very popular meta choice in the Whispers of the Old Gods and Karazhan sets, but he nearly disappeared from the ladder with the last expansion. It seems like 4 months is long enough break and the deck is back on the ladder, serving as one of the dominating forces in the meta.
With all the new tools and a variety of different tech cards available, Midrange Hunter has carried multiple pro players to high Legend ranks already. The version I’ll be writing about was created by Kolento, but it was mostly played by Orange, who took it to top 20 Legend. The list is tech-heavy, so you might want to adjust it a bit depending on the meta you see. For example, The Black Knight is a very useful tech in Legend, because you see a lot of Taunt Warriors there, but it might not be the case at the lower ranks. I’ll cover the tech cards with potential replacements near the bottom of the guide!
Midrange Beast Hunter Mulligan Strategy & Guide
I’ll divide the mulligan section into two – against fast decks and against slow decks. Fast decks are generally the Aggro decks (e.g. Pirate Warrior) or high tempo Midrange decks (e.g. Midrange Hunter). Slow decks are slower Midrange and Control decks.
Always keep the Quest in your mulligan!
VS FAST DECKS
Higher Priority (keep every time):
- Alleycat – Best 1-drop against Aggro. It has two bodies, so you have more flexibility when it comes to trading. It also means that at least one of them should survive until turn 2, so you can Adapt it with Razormaw.
- Jeweled Macaw – While weaker than Alleycat, you still want to open with a 1-drop against faster decks. You won’t likely run out of cards anyway, but the extra beast might come in handy – e.g. if you get a Taunt.
- Crackling Razormaw – Really good 2-drop, especially if you open with a 1-drop. Even if you don’t, you should be able to stick some Beast eventually and buffing it or giving it Taunt can be solid. Worst case scenario, it’s a 3/2 for 2, which might be playable in some scenarios.
- Kindly Grandmother – Might be the best 2-drop, especially if you have no 1-drop to play Razormaw on. The 1/1 can trade into a lot of the aggressive 1-drops and it’s sticky for the sake of Beast synergies.
- Trogg Beastrager – Worst of the 2-drops in fast matchups, while you can buff something, you might also not have a Beast in your hand or hit something big that won’t matter anyway.
- If you get only one 2-drop, keep it. But if you get to choose between those, Razormaw is best if you have a 1-drop, Grandmother is best if you don’t have it and Beastrager is worst of the 3. You don’t want to keep multiple 2-drops, because your hand can get clunky.
- Animal Companion – Getting Misha is a dream, but Leokk should be able to trade with the 4 health and Huffer is okay-ish if your opponent has a minion you can trade into already.
- Eaglehorn Bow – It’s a weapon, so you can get some early board control with it.
Lower Priority (keep only if certain conditions are met):
- Golakka Crawler – Definitely a keep against Pirates. Let’s be fair that most of the decks are running Pirates, BUT I’m putting it under “conditional” just in case you meet some faster deck not using Pirates (I don’t know, let’s say a Hunter mirror). However, you still want to keep another 2-drop – Golakka doesn’t always hit on turn 2 and you don’t want to drop it without utilizing Battlecry if you know that your opponent runs Pirates.
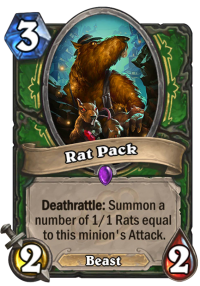
- Rat Pack – Rat Pack is really good, but slow. You keep it if you have a curve already, e.g. a 1-drop and 2-drop.
- Houndmaster – On Coin, with a sticky Beast like Kindly Grandmother. T2 Grandmother into T3 Coin + Houndmaster is a really powerful tempo play.
VS SLOW DECKS
Higher Priority (keep every time):
- Alleycat Or Jeweled Macaw – Most important thing in the slower matchups is a great curve. If you play something every turn from 1 to 6, you win 90% of the games. So opening with a 1-drop is solid. I think that in slower matchups it doesn’t really matter which one, Alleycat is probably better on turn 1, because it puts on a bit more pressure. You prefer Jeweled Macaw a bit later when you’re running out of steam.
- 2-drops: Crackling Razormaw, Kindly Grandmother, Trogg Beastrager or Golakka Crawler. You don’t want to keep multiple 2-drops, because they can get clunky and don’t really help with curving out perfectly. The priority in slower matchups is generally Razormaw > Beastrager > Grandmother > Crawler. Yes, you keep Crawler even if you don’t face Pirates if that’s your only 2-drop. You want to curve out and throwing it to find a better 2-drop is risky.
- Animal Companion or Rat Pack – Keeping 3-drops is also good in slower matchups. Animal Companion is better in a vacuum, but Rat Pack should be stronger if you have Trogg Beastrager or Houndmaster in your hand already.
Lower Priority (keep only if certain conditions are met):
- Houndmaster or Infested Wolf – If you already have a solid curve. E.g. I’d keep it if I had 2 -> 3 already, I think that solid turn 4 is more important than opening with a 1-drop. Houndmaster gets a higher priority if you have Kindly Grandmother or Rat Pack – one of them will surely stick for turn 4. Wolf is better if you have a more vulnerable hand, e.g. Beastrager into Animal Companion.
- The Black Knight – If you’re 100% sure that you face Taunt Warrior (e.g. you’ve just played against the same guy or you play in a tournament and you know your opponent’s line-up). Sure, it’s a 6-drop, but the tempo swing it provides is insane. If you can hit the 4-drop/5-drop Taunt on curve, you often just win the game because of that.
Midrange Beast Hunter Play Strategy
Midrange Beast Hunter is a very proactive, quite aggressive Midrange deck. While there is some decision making involved, the game plan should be pretty straightforward. You want to play on the curve, put as much pressure on the opponent as possible, play around AoEs to never get completely cleared and just push your opponent hard enough that you kill him. The deck has multiple Beast synergies (well, that’s where the “Beast” in the name comes from) – cards like Trogg Beastrager, Houndmaster or Kill Command all work much better if you have Beast on the board. But that’s not a problem, because you almost always have one.
Unlike the more aggressive decks, Midrange Hunter is very board-centric deck. You can’t do much without the board and you have very limited ways of coming back. It means that curving out and keeping the board control is really important, probably the most important thing when playing this deck.
Vs Aggro
Surprisingly, this deck works quite well against Aggro. Not only does it have a pretty strong early game, it has a few ways of stabilizing. Also, if you go wide in the early/mid game and counter their early drops, you might actually engage in a race and win it. It doesn’t happen often, keep that in mind. I know that I’ve mentioned it before, but curving out is really important. It basically means that if you don’t have your 1-drops or 2-drops, you want to throw away everything else. If you pass turn 1 and turn 2, winning the game will suddenly become really hard.
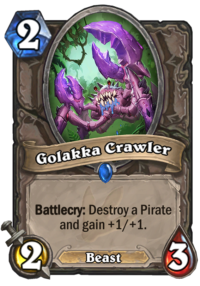
Golakka Crawler is an amazing tech in Aggro matchups. Most of the Aggro decks play Pirates, and eating a Pirate with this is nuts. In most of the matchups you can’t be greedy – you eat a 1/1 and hope that they don’t play something bigger. The only matchup that I would wait is Pirate Warrior. Against Warrior, there are TONS of good, bigger targets. Naga Corsair, Southsea Captain and Bloodsail Cultist are the best ones and you will see at least one every game. But the thing is, you can’t be too greedy. For example, if you don’t have any other 2-drop, it’s better to eat a 1/1 than skip turn 2. It’s still a 2 mana 3/4 that killed a 1/1, it’s a better Totem Golem. Stabilizing the board is most important. But if you have other 2-drop, keep Golakka for something bigger and pretty much insta-win the game by eating let’s say a 5/4.
Try to trade into every minion they play. If you make the trades, you can choose the ones that fit you best. You also have no way to heal up, so if you take too much damage early they can kill you with burn. At the same time, try to play the fastest minion every turn. Making tempo plays means that you can get ahead and when you get ahead, you just stabilize with Taunts and win the game. 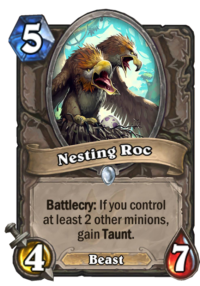
You should start stabilizing around turn 4-5. Houndmaster and Nesting Roc are AMAZING in slower matchups. Try to hit the highest health minion with Houndmaster and try to hit the Taunt with Roc (you can try setting it up on turn 4 by e.g. playing Infested Wolf and then trading it in). Do you play Nesting Roc without a Taunt on turn 5? It depends on a few things. First of all – will you be able to reliably activate the Taunt soon? E.g. if you have Alleycat in your hand, waiting until turn 6 should be good. Another thing is that if you have Houndmaster in your hand, using it on the Roc still puts a huge Taunt, so you can combo it that way. Not to mention that if you have absolutely no other play – e.g. your hand is Highmane, Deadly Shot (that you don’t want to use on some small drops) and Jeweled Macaw (which might not give you anything playable), then it’s still the best thing you can do.
The game should generally be decided around turn 5-6. Your big drops are generally too slow and won’t matter most of the time. If you have regained board control and Taunted up, you should close the game in 2-3 turns. Swamp King Dred can be sometimes useful if the game goes long enough. E.g. it’s really good against Zoo if the game still isn’t decided. The fact that it has 9 health means that opponent usually needs to play at least 3 minions into it, it’s like a super Taunt, you prevent them from playing anything. And if they have no way to kill it, you hit them for 9.
Sometimes the best tactic is to set up a reverse clock and start racing the opponent. If you have no defensive plays like Taunts, you’ll be forced to try to deal as much damage as possible. If you’re on the face rush plan, put as much attack on the board as possible, trade only if you’re under a serious threat of dying etc. The dream is to put so much pressure to force your opponent to trade. From my experience, taking risks is generally good if your hand is very aggressive. You will win more games by just going face than by trading every 1/1 they drop.
Vs Control
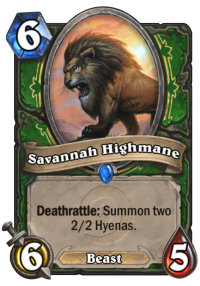
Games vs Control are longer, but also pretty straightforward. Curving out is still important, but you don’t necessarily have to play the highest tempo move every turn. For example, having a 1-drop is nice, but skipping it won’t likely lose you the game. I’d say that when it comes to the Control matchups, turns 4-6 are most important. They should be able to deal with your early game quite easily with early removal, not to mention that 3 or 4 damage per turn doesn’t put on too much pressure. Your most powerful turns start with 4 – both Infested Wolf and Houndmaster are very hard to deal with. Houndmaster buffing a Beast basically puts a 6/5 stats for 4 mana, 2/2 of which has immediate impact + it’s spread among 2 bodies, so 1 removal is usually not enough. Infested Wolf is slower, but it’s also solid, because it will likely survive – killing it doesn’t really accomplish much, it spawns two more 1/1’s. Then turn 5 is either a big Beast – Nesting Roc or let’s say a 3-drop + 2-drop or 1-drop + 4-drop. But your most powerful card comes on turn 6 – Savannah Highmane. There are only a few removals that can deal with it completely right away – Hex, Polymorph… Most of the normal removals can deal with the first body, but still leave 2x 2/2. It’s insane how often Savannah Highmane remains unanswered, because it’s simply not worth to answer it, as it takes a big part of the turn and it doesn’t remove that much power from the board anyway.
4-6 is your peak in power, so you should abuse that as much as you can. Try to push for face damage, don’t make trades into small minions. Your deck will start getting weaker and weaker past turn 8-9 (since you don’t run stuff like Call of the Wild) so try to put as much pressure as possible on those turns. If you can’t close up the game instantly, at least try to deal as much damage as you can. If you get your opponent is low enough, he will be forced to play very defensively. Normally he could drop a big minion or something in the late game, but he might be forced to play card draw to look for removal or defensive options. Or he might need to play a Taunt off-curve. Each one of these is a small victory. In the late game, try to use your Hero Power every turn. If you play against classes other than Warrior or Priest, you put them on a clock and force them to have heal in their deck. And if you play against those two, you force them to Hero Power every turn and limit their options (since you have much less cards than they have, your Hero Powers are more efficient).
Try to not play too much into the AoE. Something like a Brawl or Dragonfire Potion can wreck your board. At the same time, you don’t want to have only 1-2 minions on the board at the same time. So the best way to play around AoEs are minions that spawn something on death. If you’re going all-in on the board, try to have at least two of them so you will have some initiative going back to your turn: Kindly Grandmother, Rat Pack, Infested Wolf or Savannah Highmane. Also, before playing another minion into the board ask yourself: do you really need it? Will it change your clock? E.g. playing an extra minion to set up lethal might be valuable, you put your opponent on having a way to deal with your board, but if you’re not setting up lethal anyway and already have 4 minions with 10+ attack on the board, you can just stop at this point.
The Black Knight is an interesting tempo tool. It’s amazing in some matchups – against Taunt Warrior or Handlock it’s crazy good. Pretty much against any deck that runs bigger Taunts, so if Druid becomes popular (right now slower Druid builds are not really too common on the ladder), hitting Ancient of War is big.
Swamp King Dred might work well in slower matchup, because they might not expect it. The thing is, with all the pressure you put on them they’re forced to use removals on your smaller minions. It means that there might be nothing left for Dred. Control decks aren’t really know to run very big minions, a lot of the ones they run have low attack and high health. For example, Priest can have a REALLY hard time getting through it without Shadow Word: Death. It has won me some slower games, e.g. against Taunt Warrior. It was funny, because they had 2x Tar Creeper in their hand and they did nothing, because they only dealt 1 damage each.
General Tips
- Number of 1/1’s spawned by Rat Pack scales with the minion’s attack. So a Trogg Beastrager hitting it adds 1, Houndmaster adds 2 and Crackling Razormaw can add 3 with the +3 Attack Adapt. That’s one of the best case scenarios, you can trade up and flood the board with 1/1’s.
- Remember that Nesting Roc doesn’t have Taunt by default. You need to have 2 other minions on the board to activate it.
- Swamp King Dred‘s effect activates AFTER the Battlecries. So something like Aldor Peacekeeper will reduce his Attack to 1 before he Attacks, it doesn’t work the other way around. Keep that in mind when playing around cards.
- If you want to play Animal Companion on a certain turn, do it first. Depending on the Companion you roll, you might make the rest of your decisions. E.g. getting Leokk might improve your trades.
- If you’re in a desperate situation where Taunt is your only out, you can always try playing Crackling Razormaw. There is around 1/3 chance to get the Adapt option you need, which is better than nothing.
Midrange Beast Hunter Card Substitutions
This specific list runs 2 Legendaries, but neither of them is necessary. There are also two other tech cards – Golakka Crawler – which are great in a Pirate meta, but pretty useless if you don’t face any Pirates, so feel free to change them depending on your matchups.
- Golakka Crawler – There are multiple different cards you can change Crawlers to. Scavenging Hyena might be the best option. While it’s not particularly powerful vs fast decks, it can win some slow matchups by itself. But at the same time, you probably want to put Unleash the Hounds in the deck you run Hyena in. It’s good if you face some board flood decks, but not particularly exciting against slow decks. You can try playing Terrorscale Stalker, it might be interesting with 8 Deathrattle minions in your deck – the dream is Kindly Grandmother into Stalker on curve.
- The Black Knight – If you don’t face a lot of Taunt Warriors, you can change it for pretty much anything – you can play a 5-drops like Stranglethorn Tiger, Tol'vir Warden or Tundra Rhino. You can also put Unleash the Hounds in this slot if you run Hyenas. You can even play another 1-drop like Fiery Bat to make your early game curve even better.
- Swamp King Dred – Similarly to The Black Knight, you can replace it with pretty much anything I’ve listed above!
- Rat Pack – Since many people have asked about Rat Pack (well, it’s an Epic, so some might not have it) – it’s a really good card and it you want to play this deck will a full strength, you should craft it. BUT if you want to test it out, you really need another 3-drop in this slot. You can try Shaky Zipgunner or Terrorscale Stalker, although both would have a nice synergy with Rat Pack too. Another idea is to just run Unleash the Hounds, which should make the deck better at reacting in the mid game, but it’s rarely a good curve play. You might also consider a second copy of Eaglehorn Bow, as it’s a solid 3-drop – you can equip the weapon even if you have no good target to attack and save it for later.
Closing
If you have any questions or suggestions, feel free to leave them in the comment section below. If you want to be up to date with my articles, you can follow me on Twitter.
Good luck on the ladder and until next time!
Comments